How to Use the Macro-Tracking App, MM+
This post may contain affiliate links and Corporette® may earn commissions for purchases made through links in this post. As an Amazon Associate, I earn from qualifying purchases.
This is a little outside of our usual conversation, but I've gotten really comfortable with using the macro-tracking app MM+ — and it can be a bit tricky to get the hang of! So I thought I'd share all of my best MM+ tips.
(Note at the start that I'm not affiliated with Macros, Inc. at all, nor am I being sponsored by them for this post.)
What Is MM+ (and Why It Is the Best Macro-Tracking App)
I firmly believe MM+ is the best macro-tracking app. Indeed, I think it's the best calorie-tracking app, and I say that as someone who has used a million different calorie trackers over the years, like WW, Healthi, and MyFitnessPal. I like the MM+ app the best.
I also prefer tracking macros to points or calories. I like how when you're planning your day, the emphasis is on goals such as grams of protein, and not on “how little can I eat.”
(Friendly PSA: Know yourself well — if you're the type who finds that any sort of tracking triggers eating disorder symptoms, tracking macros may not be any different, particularly with the emphasis on weighing your food for accuracy.)
I also actually really like weighing my food. I have to wash fewer tiny measuring implements (bah, oil in a teaspoon) and have an easier time getting some products out (e.g., honey). I also feel like it kind of allows me to “measure with my heart” — how much cheese do I want on my eggs today? Let's eyeball what looks good. BUT, because I've weighed it, I can track the amount I've eaten accurately.)
This is my favorite scale — it's usually under $30 at Amazon and comes in a number of pretty colors.
I even find MM+ to be really great at tracking micronutrients like fiber, sugar, and saturated fat. As most women over 40 know, also, a lot of the dietary advice about perimenopause comes down to micronutrients — more than 25 g of fiber per day, less than 25 g of added sugars per day — and I find that the MM+ app is by far the best for tracking those goals as well as my macronutrient goals.)
You can buy the app for $2.99; it's available for both iPhone and Android. (I have an iPhone, personally, so all of these tips are based on that experience.)
{related: the best strength training programs to do without a gym}
My Best Tips on How to Use the Macro-Tracking App, MM+
1. Enter All of Your Own Food as Custom Entries
This is the biggest difference with MM+ and other apps — while they have a food library, it's really much, much (much) better to input your own custom entries. There are some Macros, Inc. entries you can use (and favorite) that are just the USDA data, but I've found if you're tracking micronutrients like fiber they're not the best.
Just add three of the foods you eat all the time for every day for the first few days — you should be there within a week. (Also, a big note: I find it much easier to enter the info on the desktop because the nutritional information goes in the same order as most labels so you don't have to mentally hop around to put things in the right slot.)
HOW you enter the info can matter, though, so here are my best tips on making custom entries in MM+:
- I prefer to scan the nutritional information rather than the barcode — even then it may misread the NI, so be sure to review it before you finalize the entry.
- Make sure the serving size is how you plan to use it — I always make sure to enter it in grams.
- Don't enter (or delete if it was scanned in) the calorie information — the program will calculate the calories based on the macros. (Don't be surprised if the calorie information ends up being different from what's listed on the packaging — a surprisingly large number of labels subtract fiber calories. “Carb-friendly tortillas,” I'm looking at you.)
- When you enter the name for the product, note that you're just doing this for yourself — so if you're going to look up something as “‘Barilla pasta,” don't just write in “pasta” because you'll never find it. I generally put in names for custom entries like “Barilla pasta (blue box) 2 oz. = 56 g.”
- Presume that at some point you're going to be weighing everything, so put everything in grams or milliliters in the serving size. Even if you end up deciding not to weigh something, if you know how much the serving size is supposed to be then you can just track it as “56 g.”
This is how one of my custom entries looks when I'm entering it for the first time:
{related: the best streaming workouts to do at home}
2. Weigh Your Meat Raw, Particularly When Using It For a Recipe or Meal Prep
Raw meat is the most accurate measure for macros. I've forgotten where I saved this screenshot from, but I found this rough conversion chart for raw to cooked foods somewhere:
(Image above shows a screenshot that reads: “We recommend weighing foods raw or uncooked as much as possible but if you must weigh and log cooked food, here are some loose conversions you can do to convert your food to a raw entry: Rice triples when cooked, divide cooked weight by 3 –> 100g cooked is 33g raw Pasta doubles when cooked, divide cooked weight by 2 –> 100g cooked is 50g raw Meat loses 1/3 the weight, multiply cooked weight by 1.5 –> 100g cooked is 150g raw Steamed Veggies don't change much so log them the same as raw –> 100g is 100g raw Roasted Veggies lose 1/3 the weight, multiply cooked by 1.5 –> 100g cooked is 150g raw.”)
If you've baking meat, fish, and/or veggies, and want to keep your portion separate from your family's, you can use aluminum foil to make a little boxed portion for yourself on the side of the sheet pan.
{related: how to fit lunch workouts into your workday}
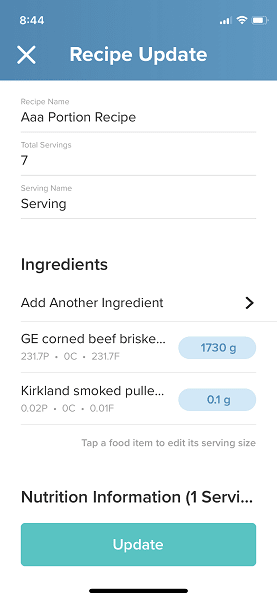
If you're solely cooking meat in the crock-pot (such as for meal prep), you should 1) weigh the total raw amount, 2) consider how many servings you've made, and 3) enter it like a recipe.
So I have a “recipe” just called “aaPortion” (because then it's at the top of the list) that has various meats. When I cook one I'll add the raw weight and select how many servings. Then for the next few days when I eat it I'll just add the meat from the aaPortion recipe. If you're freezing some or all of the servings, you probably want to write the macro information on the bag, or reflect that you've frozen two servings, or whatnot.
This is what my aaPortion recipe looks like. I may keep a lot of ingredients in there but they're all set to 0.1 g unless it's actually the meat I'm using. (This is the easy way; I'll go through the harder but more accurate way below.)
(You also, obviously, could do this for each individual meat — I'm just lazy so it's easier to have all possible meats in one recipe.)
{related: how to diet while working a corporate job}
3. Use the Recipes area in MM+ BROADLY
I tend to make a few kinds of “recipes” in MM+. First, I'll make actual recipes — but every time I make the recipe I'll change the weights for ingredients as they are in that moment. So I don't use the MM+ recipes to COOK, but instead to make macro tracking easier. I also tend to only put the ingredients that have macros into the recipes, so spices — no matter how integral they are to the recipe — are usually left out.
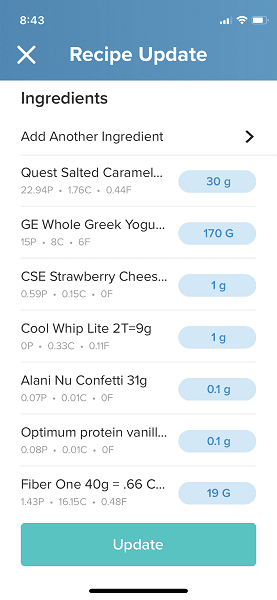
The second kind of “recipe” I'll make is a possible permutation for every kind of ingredient I might eat if I were making that recipe. For example, for my “Protein Yogurt” entry, I'll have every kind of yogurt I might use, every kind of protein powder I might use, and every kind of thing I might add. I often add Fiber One cereal, but sometimes Cool Whip, sometimes Jell-O, sometimes pudding mix. Like with my aaPortion recipe, I keep all ingredients at 0.1, and when I go to make my protein yogurt for the day I enter the individual weights.
(I also do this with egg wraps, where my “recipe” includes every kind of tortilla I might use, every kind of cheese I might use, and extra things I might add, like meats or veggies. And I've recently started doing this with meals where we tend to graze, so I have a “Wine & Cheese” recipe that lists every possible cheese, olives, crackers, etc., that we might eat.)
Here's how my “recipe” for protein yogurt looks:
{related: tips for women lawyers on finding time to exercise}
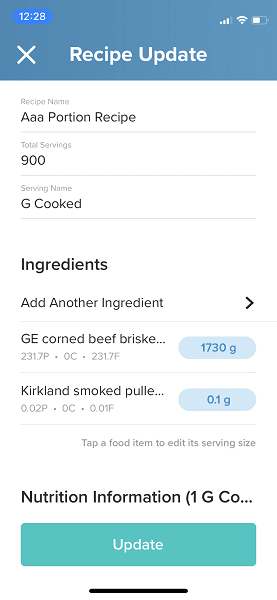
The third kind of recipe I make is for portions, as described above — I even do this for roasted vegetables if I'm tracking micronutrients like fiber (or accidentally had a really big olive oil pour). (Upon entering the weight, I'll try to figure out servings based on roughly how many calories I'd want for a particular meal, and then finally say “7 servings” or whatever. Another way to do it is by weighing the final product and entering that as the serving size on the recipe — then, when you eat it, weigh the amount in your meal and enter it like that.
Here's the harder way to do meal prep for meats — I consider it harder since you have to remember to weigh it raw, weigh it after it's cooked, and then weigh it each time you go to eat it. But it's definitely a more accurate way to track meal-prepped meat!
{related: snack ideas for work}
The fourth kind of recipe I make is for things I eat all the time but frequently forget to log. For example, I tend to have 2-3 snacks every day, many of which are repeated often. So I'll make a “recipe” with ALL of the snacks I might eat (and again, keep the weights at 0.1 g), and then if I'm meal prepping I can enter them all in at once (“add individual ingredients”) and adjust the weights if and when I actually eat the item that day. I think it's important to include all those little things that you might not otherwise track — such as avocado oil sprayed on air-popped popcorn, cream splashed into coffee, or even a few Tootsie rolls grabbed during the day. It's easier to remember to track them, as well as to see how they fit into your day, if they're on the list.
For example, this is what my aa Snack entry list looks like — I tend to forget to log a lot of these otherwise. (I mostly track the veggies and fruits because I'm trying to get at least 25 g of fiber a day.)
The fifth kind of recipe I make is a little bit different — I'll use the recipe function to make lists of “Need Fiber” or “Need Protein” or “Need Fat.” Then, everything I eat that might help me meet my goals is listed. Sometimes I have to make a custom entry for something that's a recipe — so while Protein Yogurt varies in macros and calories each time I make it, I've created a Custom entry for “Protein Yogurt Placeholder” that has the general macros so I know generally how it could fit into the macro budget for the day.
This is how my “aa Need Protein” entry looks. (Note that the Recipe area is really easily searched, but if you're the type to forget that you've either a) created a wacky entry like this, or b) what you've called it, you can always put “aa” in front of the name so it appears at the very top of the Recipe list.)
{related: how to fit exercise into a busy life}
Thoughts on Meal Prep and the MM+ App
If I'm making something like protein yogurt, protein fluff, or protein pancakes, I tend to make three servings at a time — or at least, most of them. I'll use smaller ramekins (like these) to hold dry ingredients that have been weighed. The wet ingredients are usually something easy for me to remember and add later (170 Greek yogurt, 1/2 cup water, etc.). (The third serving is the one I'm eating, and I'll add the wet ingredients there.)
{related: here are all our tips on bringing lunch to work}
If I'm making a recipe that makes seven servings and am serving three servings that evening, I often pre-portion the rest of the servings right after I'm done cooking. So I'll line up three bowls or plates for that evening's meals, then put our four storage bowls (like these), and add a spoonful to each bowl, going around until they're mostly even.
(Hat tip to Stay Fit Mom, who introduced me to these affordable and oven-safe storage bowls!)
(If you have storage containers with subdivided portions, like these, you can also save portions that way — I do that with steel-cut oats; I could also see it being helpful for meat sauce or something fairly compact.)
{related: tips for eating late at the office}
Notes on Eating Out and Macro Tracking
The MM+ app is not great when it comes to eating at restaurants. So I tend to deal with it one of two ways:
First, if I know it's something we eat frequently, I'll try to look up the nutritional information and make a custom entry for each of my preferred items. (Then you can make a “recipe” with the name of the restaurant that has each of those custom items in it, so you're not hunting every time you get takeout or whatnot.)
But if it isn't something we eat frequently, then I'll just go to MyFitnessPal (the free version), add the ingredients from whatever we ate, and then use the “Fast Track” entry option to add as much nutritional information from the meal as possible.
{related: how not to gain weight during the summer recruiting season}
Readers, what are your best tips for using the macro-tracking app MM+? Do you track macros?
